


Rank 1
January 14, 2020
Solved

How do I read rate 1 & 2 on my Landis+Gyr (L&G) E470 series 3 S2 electric smart meter?

  • January 14, 2020
  • 15 replies
  • 24159 views

How do I read rate 1 & 2 on my E470 series 3 smet s2 electric meter as I can only find rate 1

Best answer by Amy_OVO

Updated on 17/04/26 by Abby_OVO


Great question to ask about how to take a reading from your Landis and Gyr E470 smart meter. These meters are pretty confusing as there’s a few different types with the same model name which may be SMETS1 or SMETS2  (more info on this great user-guide).


In general the method for taking peak and off peak (day / night) readings for these meters is the same, even though the buttons involved may be spaced slightly differently:


Press and hold down the ‘B’ button for roughly 5 - 10 seconds  - then tap the ‘A’ button. This will toggle between the ‘R01’ reading and the ‘R02’ reading as demonstrated in this handy video.


If your square buttons are spaced out in diagonally opposite corners like this:
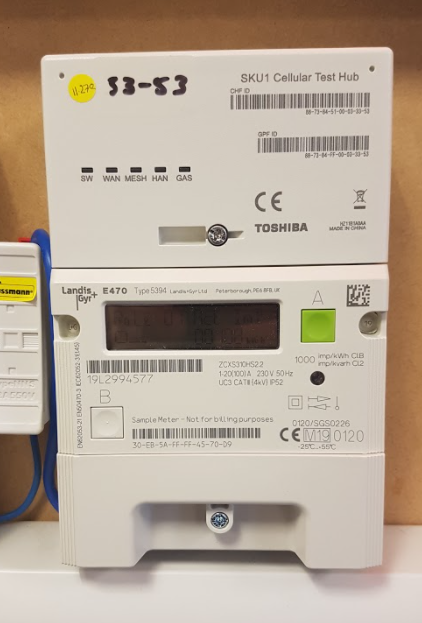
 

And this one’s type 5394


It may look slightly different but the process is the same, but you can check out this video here, also.


We’ve also got a similar guide on reading these meters over here.

15 replies

Amy_OVO
Retired Moderator
Amy_OVOSolved
Retired Moderator
January 14, 2020

Updated on 17/04/26 by Abby_OVO


Great question to ask about how to take a reading from your Landis and Gyr E470 smart meter. These meters are pretty confusing as there’s a few different types with the same model name which may be SMETS1 or SMETS2  (more info on this great user-guide).


In general the method for taking peak and off peak (day / night) readings for these meters is the same, even though the buttons involved may be spaced slightly differently:


Press and hold down the ‘B’ button for roughly 5 - 10 seconds  - then tap the ‘A’ button. This will toggle between the ‘R01’ reading and the ‘R02’ reading as demonstrated in this handy video.


If your square buttons are spaced out in diagonally opposite corners like this:


And this one’s type 5394


It may look slightly different but the process is the same, but you can check out this video here, also.


We’ve also got a similar guide on reading these meters over here.

OVO-Joyed to help!
Rank 2
October 2, 2025

I have just been fitted with a new smart meter. Lands+Gyr Type 5533. Although I can find Rate 1, I cannot find Rate 2. Any advice would be welcome.


NB It has an A button and a B button just below the A.

Blastoise186
Super User
Super User
October 2, 2025

Howdy ​@ypr52 !

Bear with us!!! We’re on it! This may take a little time to research, so we’ll be back when we can find the answer for ya.

Securing energy by zapping security bugs... For that is The Blastoise Way! Remember, I'm just like you - AI Powered Evil Geniuses aren't Staff!
Rank 2
October 2, 2025

Okay. I look forward to any help I can get. 

BPLightlog
Super User
Super User
October 2, 2025

Landis & Gyr are really bad at their user interfaces.

I believe with the type you mention, you need to hold button B for 3-5 seconds (the time should appear). Then if you press A (at the same time) to move through the registers it should move between Rate 1 and Rate 2

Bring me Sunshine ~ E&E {Solar PV, Battery Storage, Hybrid EV, ASHP and Home Assistant automation}
Rank 2
October 2, 2025

Thank you for taking the time to answer, however, I have tried the method you described and it doesn’t work on this particular meter. 

BPLightlog
Super User
Super User
October 2, 2025

Thank you for taking the time to answer, however, I have tried the method you described and it doesn’t work on this particular meter. 

Ok - according to their manual it should be something very similar.

Here’s their notes:


Consolidated step-by-step for your meter (type 5533 / E470)


  1. Wake / activate the display
    Press the A button (or either button) so the screen lights and shows the default register.
  2. Get Rate 1 (import)
    Press and hold A until the display reads “Rate 01 Act Imp” (or “IMP R01”).
    The number next to kWh is your Rate 1 (import) reading.
  3. Switch context to see Rate 2
    Press and hold B for around 5 seconds. (This changes the register selection context so you can access the alternate rate display.)
  4. Get Rate 2 (import)
    After holding B, press and hold A until the display now reads “Rate 02 Act Imp” (or “IMP R02”).
    The number next to kWh then is your Rate 2 (import) reading.
  5. Record both values
    Write down both readings (usually the integer part, e.g. first 6 or 7 digits, ignoring decimals).

Not sure what to suggest if that doesn’t work - another volunteer might be able to help further of course

Bring me Sunshine ~ E&E {Solar PV, Battery Storage, Hybrid EV, ASHP and Home Assistant automation}
Rank 2
October 3, 2025

Thank you for the information but, sadly, it doesn’t seem to work with my meter. I will OVO next.

Chris_OVO
Community Manager
Community Manager
October 3, 2025

Hey ​@ypr52


Have you had the chance to try the additional steps from BPLightlog mentioned above? Could you share a photo of what you see on your meter?

Renewable energy jokes never get old.
Rank 2
October 3, 2025

These are the only two images that relate to meter readings; using the B button doesn’t give me access to the Rate 2 reading.

This one is on start up.
 
This the Rate 1 reading.