Wall and cavity insulation: Thermal images and how to reduce heat loss they show

  • 14 December 2021
  • 7 replies
  • 702 views

Userlevel 7
Badge +2


One of the rooms we are struggling to heat is our master bedroom. It has a dressing room as part of the space and has 2 Climavent radiators. It also has 2 external walls. (Stand-by the first forum outing of the Flir One) Here you can see the new A rated windows doing it’s job; you can also see the ClimaVent radiator throwing out some heat and the heat hitting the ceiling. You also see the dark colours of the walls and ceiling (loft was insulated 2011) - dark means lower temps / poor insulation. 


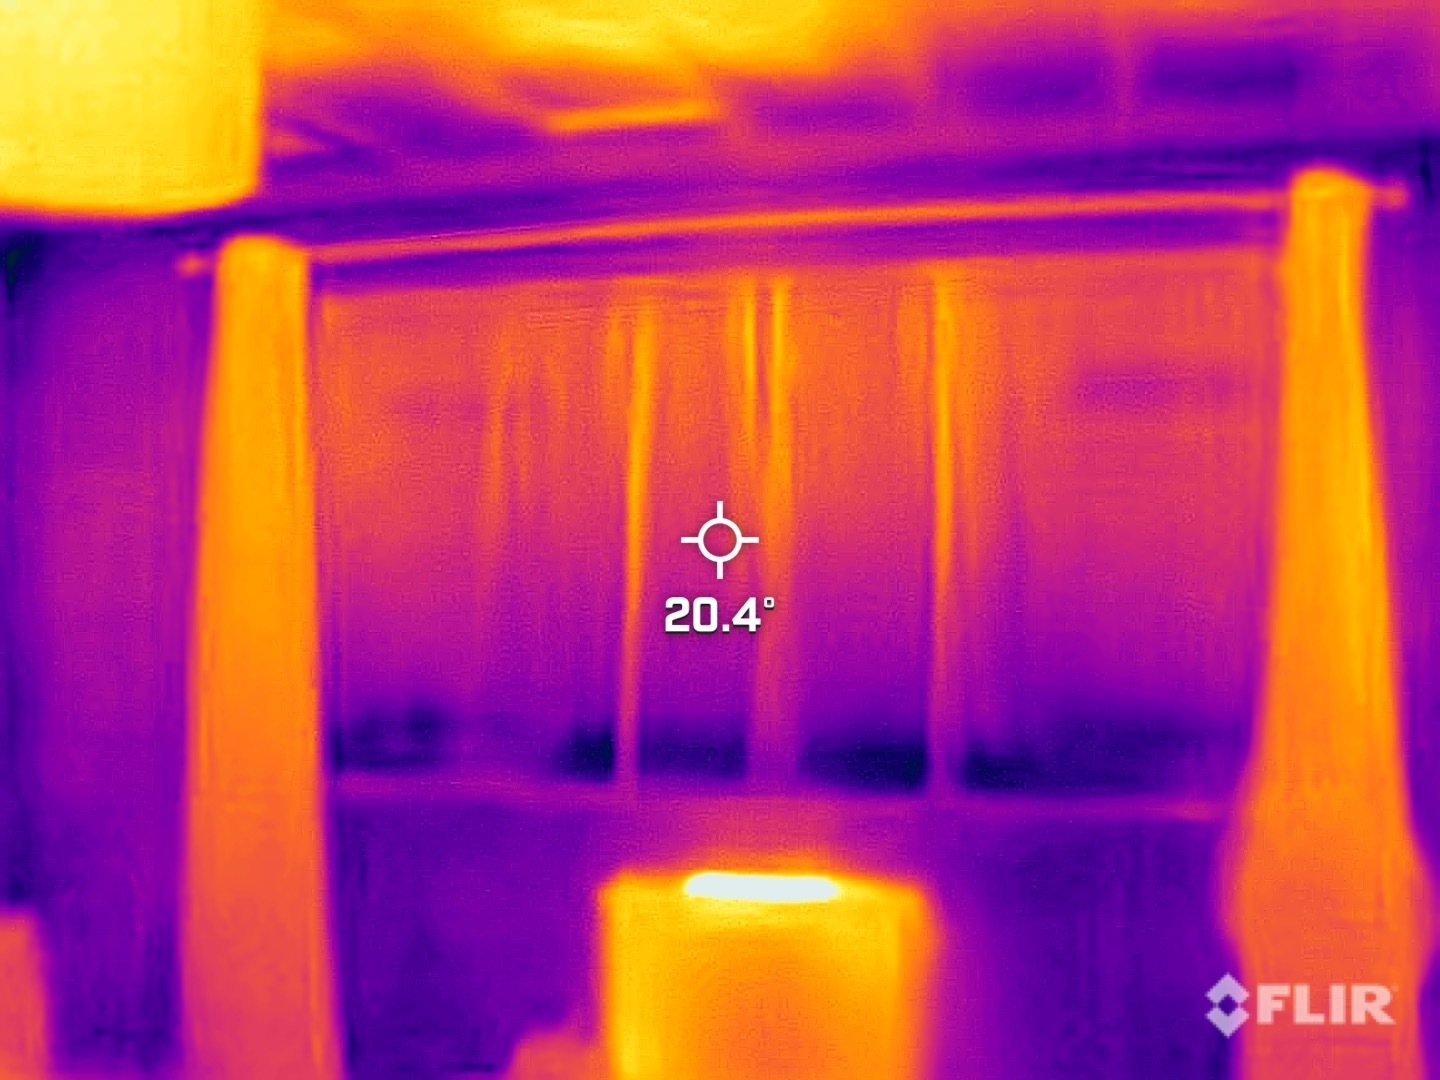
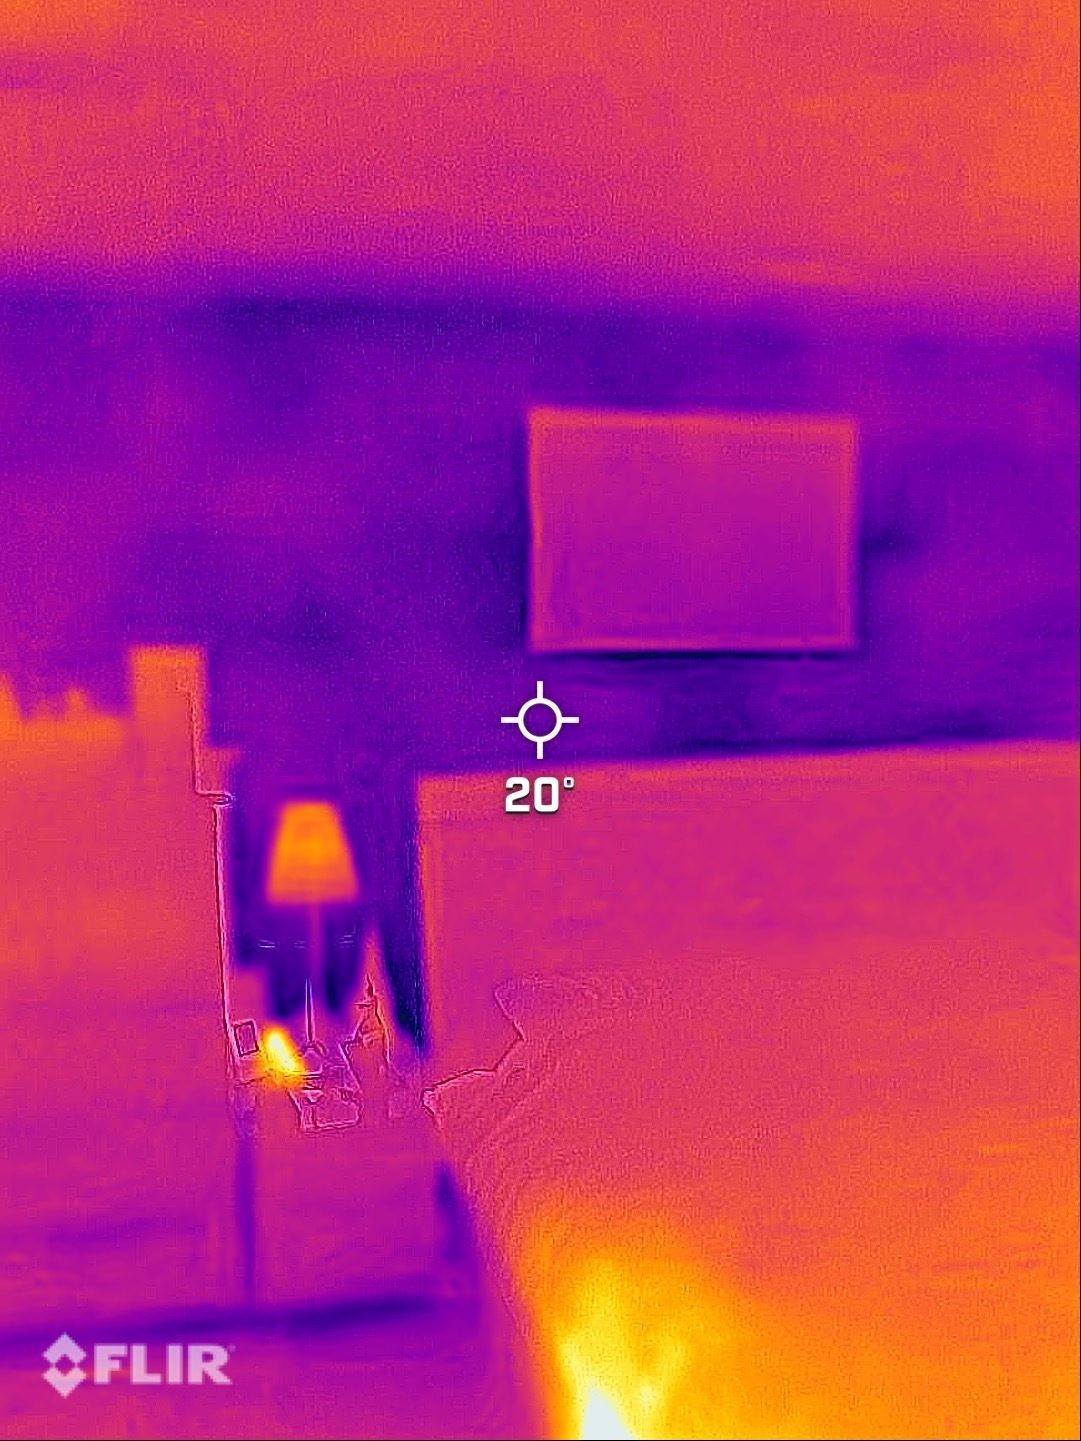
Above is the same room but the wall is external to the east, the hot patch on the bed is the fan heater we use to raise the temperature in the room and the bathroom. You can even see some of the mortar lines where the cold has come through. We are about to do a major refurbishment of this room and I am considering having insulation backed plasterboard on walls that are external as well as the ceiling - would you recommend this?


Thanks for the IR photos. Very useful.

There’s clearly something wrong if the radiator flow temperature only reaches 31°C.  If the Installers quoted 45°C, then perhaps they’d like to come back and fix it!

Even so, you would doubtless achieve greater efficiency with wet UFH because the Heat pump wouldn’t have to work so hard. The greatest amount of energy consumed would be that required to effect the phase-change in those SunAmp batteries…

… which I guess won’t last long unless SunAmp can come up with an explanation as to why your house is consuming so much electricity. :thinking:


Let’s now comment on the IR pictures of the master bedroom. Here’s a comparison of the two views of the ceiling:


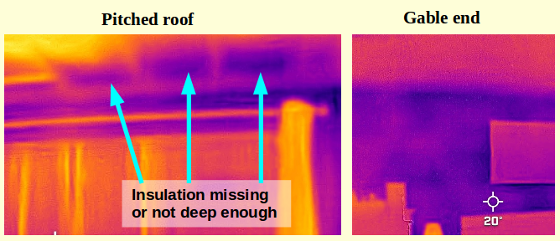
The gable-end is easy because the insulation is simply rolled out against the ceiling joist which abuts the wall.

But where the roof slopes down towards the facia boards, the insulation rolls haven’t been extended down onto the wall-plate by the installers.

Here’s a diagram of what it’s meant to look like:


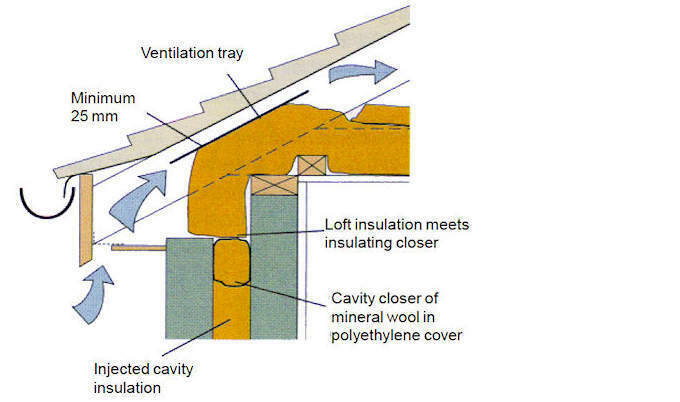
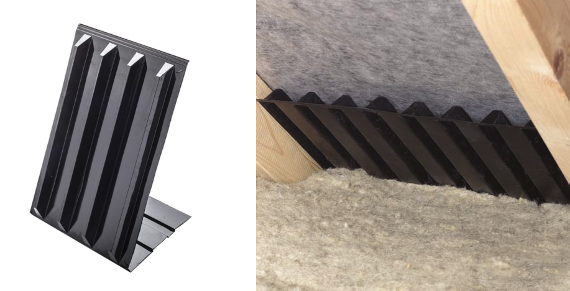
Ventilation trays are cheap and easily obtainable. Klober manufacture one which also seals across the top of the cavity.


You’ll have greater difficulties finding a (small) installer who’s prepared to crawl in there and put it right!


7 replies

Userlevel 7
Badge +2

I missed out responding to an earlier question from @hambrook 

I am considering having insulation backed plasterboard on walls that are external as well as the ceiling - would you recommend this?

Yes.

And particularly so as you’ve pointed out that the thermal camera can see the block mortar-lines on the inner wall of the upstairs bedroom. That suggests the cavity insulation isn’t great. :slight_frown:

As a self-builder, I haven’t had hands-on experience with thermal plasterboard.

I’ve taken the route of fixing vertical battens to the wall, infilling with PIR insulation board, and then screwing plasterboard to the battens. That’s cheaper for materials, but takes longer to fix.

The combined thermal-plasterboard materials can be fixed to an existing wall using dot & dab (direct bonding) which is quick. However you need to check what the surface is for the current wall. Personally I wouldn’t trust direct bonding onto a wall painted with a vinyl emulsion. The whole point of vinyl is to reject anything you try to stick on it!


I’d recommend starting your search on the website of Insulation Express. That’s the online/retail name for Sheffield Insulation Group (SIG), who are the largest suppliers in the UK.

For alternative quotations, talk to Travis Perkins. Their sister-company is CCF, the second biggest insulation supplier. They can trade between the companies and supply you from your local TP branch.

TP attract a high proportion of self-builders who can open accounts and obtain trade rates.

Userlevel 4
Badge +4


Yes.

And particularly so as you’ve pointed out that the thermal camera can see the block mortar-lines on the inner wall of the upstairs bedroom. That suggests the cavity insulation isn’t great. :slight_frown:

As a self-builder, I haven’t had hands-on experience with thermal plasterboard.

I’ve taken the route of fixing vertical battens to the wall, infilling with PIR insulation board, and then screwing plasterboard to the battens. That’s cheaper for materials, but takes longer to fix.

The combined thermal-plasterboard materials can be fixed to an existing wall using dot & dab (direct bonding) which is quick. However you need to check what the surface is for the current wall. Personally I wouldn’t trust direct bonding onto a wall painted with a vinyl emulsion. The whole point of vinyl is to reject anything you try to stick on it!


I’d recommend starting your search on the website of Insulation Express. That’s the online/retail name for Sheffield Insulation Group (SIG), who are the largest suppliers in the UK.

For alternative quotations, talk to Travis Perkins. Their sister-company is CCF, the second biggest insulation supplier. They can trade between the companies and supply you from your local TP branch.

TP attract a high proportion of self-builders who can open accounts and obtain trade rates.


You keep making more work for me! Looks like I am going down the batten and PIR insulation boards - I get 20% off at Wickes so might be as easy to get the local brand to deliver what we need . Without going to far off topic; what thickness insulation would you recommend for this top up?

Userlevel 7
Badge +2

If you’re going to use battens @hambrook  then I guess that’s because you’ve decided to do the job yourself, and labour costs aren’t a factor.

Wickes is also part of the Travis P group, and any TP Manager will price-match. I’m unsure whether they’d take the 20% discount into account. I know my branch would because that’s still higher than the rates for trade account-holders.

(And Toolstation is also now 100% owned by TP, but there’s no inter-trading between them and other parts of the group).


As for the PIR board thickness, this could be ‘properly calculated’ by starting with the R-value of the existing wall.

However, there are some common-sense rules that most self-builders would go by.

First, consider the range of thicknesses which are normally offered if you were selecting from the more expensive Thermal-plasterboard material.

20mm is just too little and not really worth the effort.

At the other end of the scale, 80mm would be over-the-top because the cost and difficulty in fixing it would outstrip the possible energy savings. So you’ll want to choose between these extremes.

a graph of no great accuracy(!)

Next, consider then the available thicknesses of timber battens. Remember there must be no insulation standing ‘proud’ of the battens because this would break the plasterboard when you screwed it home.

Given that your existing wall materials have no thermal properties, I think you’d be looking at wall insulation of 40-50mm thick.

It’s easier to use 40mm because you can easily buy nominal ‘50mm’ thick treated/sawn timber. These days it is invariably regularised, giving an actual thickness of 46mm and slightly-rounded corners (no splinters!).

So if you bought nominal 50mm-square timber lengths, you could easily fit 40mm PIR board between the battens, regardless of how bumpy is the existing wall plasterwork.


The ceiling is a different prospect because you’ve already got timber joists above. It’s easier to screw a counter-batten in place below them than it is to line up wall-plugs for wall battens.

As more heat travels through the ceilings/roof than the walls, you may want thicker insulation above the new ceiling. But this depends on the thickness and condition of your existing loft insulation.

Current Building Regulations require 250mm (10-inches) min. thickness of glass-wool, or the equivalent, if that helps your assessment.


And I really feel this sort of discussion should be out in the main Forum, rather than here in the Treehouse. Stand by for the Moderators to suggest moving it!

Userlevel 7
Badge +2

My next suggestion, @hambrook  is to use the opportunity afforded by the new insulated wall to place ducts within its depth which could be used for a future MVHR system.

If you hacked off the existing plaster from a 110mm-wide vertical strip between battens, you’d have space for a 110x54mm rectangular duct from the attic to the ceiling void of the ground floor.

Parts and prices from suppliers BES here, and it’s not expensive.

If there’s enough depth to do so, then wrap the rectangular duct with thermal bubble-wrap. This will reduce heat losses en-route and suppress the ‘white noise’ caused by air movement.

The most labour-intensive part of installing a ventilation system as a retro-fit is the routing of the ducts. So placing some into the walls/ceilings whilst you the opportunity will reduce the overall costs.


At this stage of planning I’ll assume that you don’t need me to tell you how to set electrical back-boxes into the new wall. But there is an opportunity to add an extra socket or two, provided that you don’t run cable next to the PIR board itself.

Insulation around mains cable means that it’s less able to dissipate heat, so its current-carrying capacity will be de-rated by your electrician.

Personally this is the moment when I’d be changing lighting to dedicated LED fittings (ie not LED bulbs). So I’d be running cable to take 24v DC to wall lights beside/behind a bed for example. Even if you never use it, the cable is there behind the plasterboard!

Userlevel 7
Badge +2

I’ve put more information about PIR board over here in the topic about Roof v Loft insulation. Go there to see suppliers for B-grade boards and advice on cutting.

Userlevel 4
Badge +4

As a result of @Transparent ‘s great advice I now have a builder coming to look at the battens, insulation and plasterboarding 

Userlevel 6
Badge +2

As a result of @Transparent ‘s great advice I now have a builder coming to look at the battens, insulation and plasterboarding 

Did anything come of this?

Reply