House insulation, electricity cables and fire risk: the good and the bad...
.How to combat Climate Change without setting fire to your house!
It's autumn and energy-conscious householders will be adding insulation to lower their heating bills. But beware... your home could be getting a lot warmer than you'd intended.
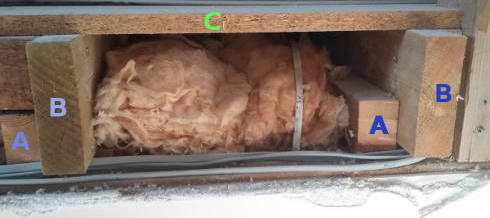
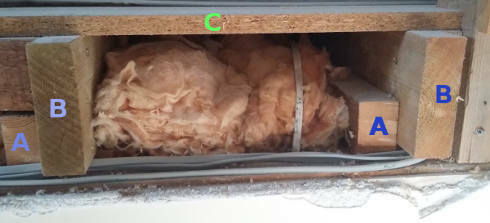
What's wrong in this picture from an attic?
At first glance this looks good. The original insulation layer above the ceiling (A) was too thin, and a second layer (B) has been added above it. The area has then been boarded with chipboard (C).
There’s a low-voltage transformer (D) which has been properly screwed to a wooden beam and insulation pulled away to make sure it doesn't overheat.
A downlighter installed in the ceiling below has been fitted with an intumescent smoke hood (E) and its ventilation holes are also left uncovered by insulation. If there’s a fire below, the intumescent material will expand rapidly, filling the hood and preventing flames and smoke spreading through the attic.
The problem, however, is the two mains electrical wires running into the insulation layers at bottom right. This is a serious fire-risk.
All electrical cables will produce heat. The higher the current (in Amps) the more energy is lost as heat.
Adding insulation above a cable like this reduces its current-carrying capacity by 50%.
Thus a typical 10kW electric shower fed via a 6mm² twin&earth cable is able to carry 46 Amps in free air, but only 23A when surrounded by loft insulation. As 10kW requires 43A, the cable was already on its limits, and it is almost certain that electricians would now use a 10mm² cable for such a shower.
Even so, that 10mm² cable still must not be surrounded by insulation. Plastic covered cables are normally rated for a maximum 70ºC, and shouldn't ever be placed where their temperature will rise above 45ºC.
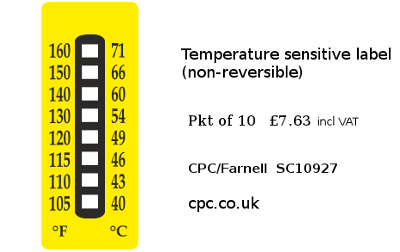
This can't be checked using test equipment carried by an electrician. If you want to know the actual temperature of a cable, then you need to stick a temperature-sensitive label to it. This will record the maximum value to which the temperature rises.
So what's the correct way to install loft insulation?
All electric cables need to be in free air above the insulation, and well clear of any flooring above.
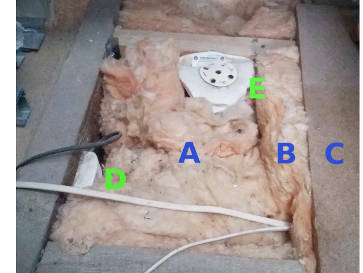
Here's a cross-section of an attic floor as it should be. The original ceiling joists (A) have additional floor joists (B) positioned between them. The chipboard floor panels (C) are screwed to those.
In the above photograph, the floor joists (B) have notches cut from them, allowing the grey cables to pass freely along without drilling holes.
The older, white cable is run on top of the insulation, permitting it to radiate heat into the air-space above. If the cable doesn't have enough slack to do this, then replace it. The risk of a fire isn't worthwhile saving the cost of new cable.
I am constantly surprised how often I find professionally installed loft insulation which has been installed on top of heavy-current cables. Even if you have a certificate declaring that your insulation has been laid to the correct standards, that is unlikely to include the electrical cabling which the installers encountered.
If you're unsure - check it!
Page 1 / 1
@PeterR1947@NoPoke@jdenver@Peetee - I have you all down as being a bit savvy with energy efficiency and/or home improvements.
What do we think of the advice here from @Transparent ?
Wise advice from Transparent but one observation from me; when additional insulation is added and then chipboard is added, the chipboard compresses the insulation, leaving no air gap and therefore reducing its efficiency.
To add new insulation, you should do one of three things:
The solution I used in my loft, the insulation was halfway up the joists (1986 insulation standard) so there was already an air gap; I laid Knauf Spaceboard on top of the joists (unsure if this is still available but B&Q have alternatives), this was equivalent to 10” of fibreglass, then chipboard is fixed on top using 5” screws through to the joists.
A bit pricier and more difficult, lay 4” x 2” timbers at right angles to the joists, add additional insulation and chipboard on top, option 1. Is better
I agree @PeterR1947 ... but may I just point out that Loft-legs are for situations where the ceiling joists of the floor below are adequately sized to be able to support the attic floor above.
The photo I presented above was where this wasn't the case. The ceiling joists were only 75x50mm (3" x 2") and had a span of around 4m. This is pretty common.
I have used Loft-legs, but only for situations where the boarded area in the attic is intended to store boxes of "stuff" rather than support people.
Q. So how can you tell if the timbers are adequately-sized?
A. The definition is in Part-A of the Building Regulations, Appendix-A. Unfortunately HM Government have removed Appendix-A from the last 3 issues. The tables were last published in the 1992 Edition, which you can download from here on the Planning Portal.
Whether you use joists or loft-legs to support an attic floor, you still need to be certain to retain adequate ventilation for heat arising from transformers and downlighters. Once you've laid the flooring, those items will no longer be available for inspection!
If you do decide on Loft-legs, there are alternative designs and suppliers apart from B&Q / Screwfix (both Kingfisher Group). Have a look at the similar product from Toolstation and Wickes (both part of the Travis Perkins Group).
Finally, I should've written earlier that the intumescent downlight-cover I showed in the first photograph of this Topic is also available from Toolstation here.
The airspace around cables and other heat generating equipment is important. It effectively increases the surface area by at least an order of magnitude through which the evolved heat can escape. But it may not be enough to protect power cables if your loft gets very hot in summer as many do. It is just as important that the wiring is run along the ceiling for most of its route as that acts a a "cool plate" during summer when the attic is very hot.
If the only electrical circuits in your loft are now low energy lights then cable through insulation is much less of a risk. The lighting load supplied by the ceiling lights in our house is now well under 200W so under 1A. The 1mm2 T&E in the loft even at 60C ambient is at less than 25% capacity. So I am untroubled by our buried lighting circuits.
The ;TLDR is that running high power cables in insulated or hot spaces takes care and the tradesmen adding insulation to a loft are unlikely to take the appropriate levels of care.
What to do if you are concerned?
If you have an electric shower or other high power appliance get someone competent/knowledgeable to check.
If you still use incandescent lights or the lighting load is more than 1A get someone competent/knowledgeable to check. Note to self to change the 6A MCB to 2A.
Personally i would not notch the bottom of a joist. I'd drill a hole in the middle where the fibres are not in tension/compression
Thanks for the observations @NoPoke.
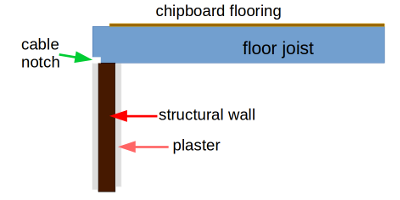
I wouldn't normally notch a joist either, but in this case the photo is looking at the end which is beyond the point where it bears on the supporting wall below:
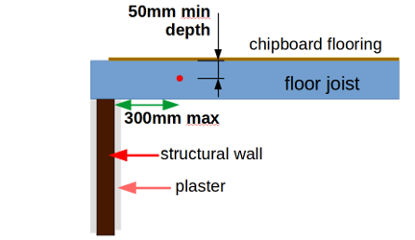
I wouldn't usually have access to the end of a joist like this, so drilling a hole is normal practice. There are guidelines in the Building Regulations to ensure that the strength of the joist isn't compromised and that screws are unlikely to pierce cables running through the hole:
Mains cables running though holes are also at risk of over-heating when heavily loaded. The general rule is to ensure that the cables fill no more than 50% of the available hole, so that air can pass through to aid cooling.
Once again, electricians don't have instruments which can detect this.
But if you're going to be laying insulation between joists, then now is the right time to check this.
This is a popular thread over the last few months, @Transparent - is there any advice you’d want to add or update to help anyone looking for help with this important, potentially disastrous area of home improvement?
I think it’s worthwhile mentioning that cables should never be run within the cavity of the outer wall of a house.
If the cavity is later filled, then it would surround the cable with very efficient insulation, thereby having the potential to overheat.
Any cable which has to be run through a wall should be taken via a piece of conduit. It’s not permitted to simply drill a hole and shove the cable though it!
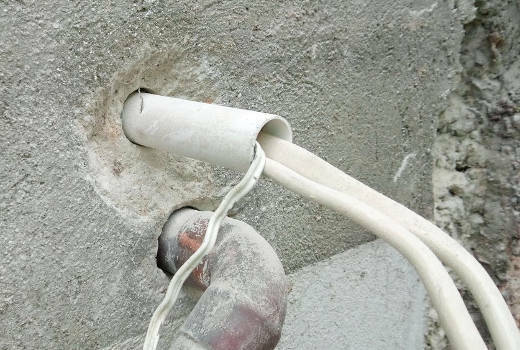
Here’s a 20mm plastic conduit carrying two low current lighting cables and a bell-wire into a porch. Note how the electrician made sure that the conduit extended well beyond the wall when it was installed about 20-years earlier.
There must be air space left within the conduit. The rule of thumb is to use a conduit sized such that the cables don’t occupy more than half of the available area.
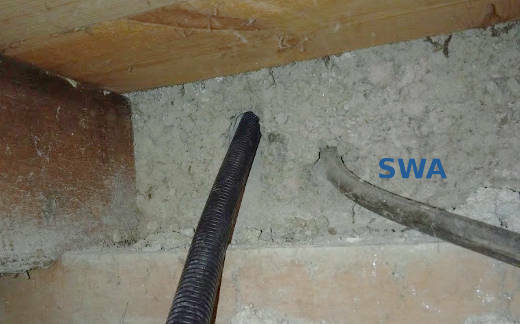
Here’s a photograph taken below floor level. It shows two cable runs through holes drilled at an angle to minimise any sharp bends.
The right-hand cable is Steel Wire Armoured, suitable for direct burial underground. It requires no further protection.
But the left-most cable-run uses a 20mm flexible conduit. Instead of being cut short once it’s clear of the wall, this flexi-conduit has been used for the entire underfloor run. That gives the cables much better protection against rodent attacks.
I have zero junk in my loft, but is it ok to use the loft-legs plus bits of chipboard to create bridges or tunnels over the wiring, even though I then cover the chipboard with more insulation ? If so should I leave clear openings for ventilation at the ends of the bridges/tunnels ?
There are several notes about loft-legs 7 or so comments earlier @102204977 .
The main point is to allow breathing space around the cables to prevent overheating which could lead to a shortening of the life of the wiring
@BPLightlog this is something I’ve worried about too. It’s really difficult to find a definitive answer to whether the wiring is safe. In my bungalow all the wiring goes up into the loft space. Mostly it’s clipped onto the joists which I’ve read is good to absorb some heat. Then I’ve read that lighting cables don’t really generate much heat so it doesn’t matter if insulation goes right up to them but it does matter for Power socket cables. Recent wiring I’ve had done is attached to the rafters (I mean the sloped ones, are they rafters?) so they’re well away from the insulation. Older armoured cables have just been laid flat near but not attached to the joists and are too tight to move. It’s a bit of a mess !! What’s wrong and what’s right??
ps. I used LoftZone legs and struts to fix my loft floor onto, the flooring ends up higher and you can get the full thickness of insulation plus an airspace btwn that and the boards for ventilation. It’s quite expensive but I (and the heating engineers who can be quite heavy!) need to walk across it to get access to my heat pump.
Yes, I understand @juliamc . Nobody much bothered about this a few years ago but with the trends to insulate, it is more important that cables are allowed space. You are correct about lighting wiring, especially with so little current being used by modern lights but this is why there is the comment about power cabling in particular and trying to use the rafters (joists tend to be horizontal) to maintain a degree of air around them. There is a calculation that can be made about the cable size, type, load and max temperature for the cable, otherwise the cables insulation can degrade and perish, hence the potential for damage and failure. Much of the insulation applied in lofts I have seen is simply packed in with no regard to this
Incidentally there is a whole info piece on this, extra demand on cabling due to EV’s, Heat Pumps etc on the IET forum
Is there a product like a mesh shield that can be fixed over cables to keep the insulation the correct distance away from them ? Thanks for that link, a bit of light reading for later!!
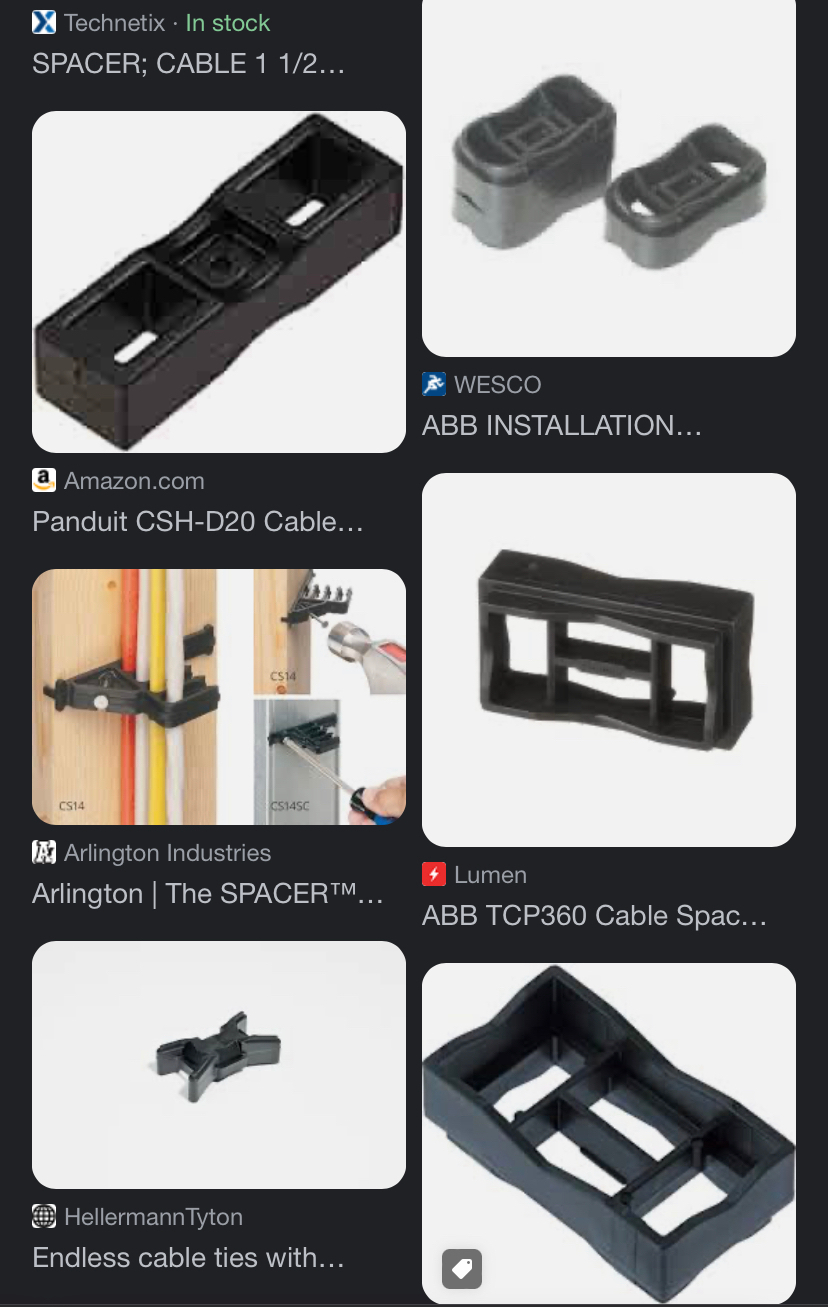
I haven’t seen a mesh. There are spacers but these tend to be designed for point to point which doesn’t really help in this case. You can use a conduit of course as long as it’s not overfilled
Details here describe factors to consider with cabling and possible limitations to put in place
In my bungalow the bathroom has a extraction fan linked to the light. When I switch the light on, the fan starts, and stays on for a short time after switching off.
Now, after I had extra insulation installed, if I switch on, the fan comes on for a short time only, then goes into a ‘flapping’ mode. When I switch the light off, the fan comes full on again for a short time.
I am going to have to wait until one of my agile grandchildren appears to go up and free the cable from the insulation ( I am 80-y-o, and have never managed to get up there ).
I did get the insulation installer to ensure the cooker cable was free, but I didn’t think about the fan.
Once one of your grandchildren has taken a look would be really interesting if you could pop back with your findings @PeterR2024, might be helpful for other community members with a similar issue.
Reply
Need advice from other members?
Ask your question to our members - they have the experience you're looking for: