Tutorial

Solar Photovoltaic (PV) panels - Self installation Guide

  • 8 August 2021
  • 4 replies
  • 670 views
Solar Photovoltaic (PV) panels - Self installation Guide
Userlevel 7
Badge +2

Updated on 14/12/23 by Emmanuelle_OVO: 

One of our community members has written this guide to help if you’re planning a DIY-approach to installing some solar panels. It’s worth mentioning that the instructions below are followed at your own risk, If you’re not sure you can manage installing solar panels yourself we’d recommend consulting a MCS registered installer.

Check out this topic to find out more about OVO’s Solar Offering:


I’ve been using PV Solar Panels off-grid for about 20 years. I have built a number of devices which can use the DC power directly rather than convert it to 230v AC mains first. I even have solar-powered chickens with timed coop-lighting which fools them into thinking they have Mediterranean day-lengths. Lots more eggs :yum:

battery hens?

This year (2021) I’ve started an extensive revamp of my rooftop solar panels, and had one completely new array installed professionally by an MCS-accredited company. That allows those panels to be grid-connected either using an inverter or a Storage Battery.

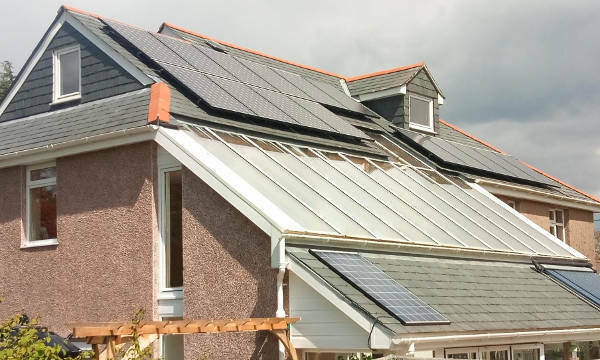
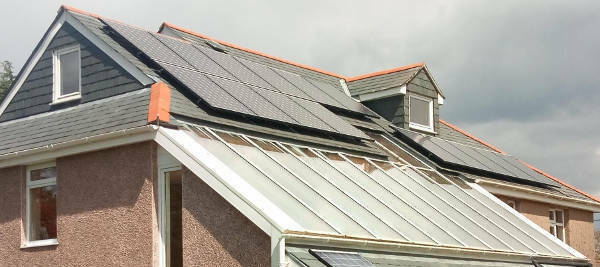
Fortuitously my renovated Devon farmhouse has an extensive south-facing roof at the ideal angle of 35°

Array A is grid-connected

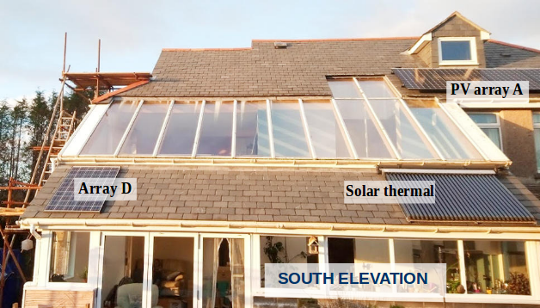
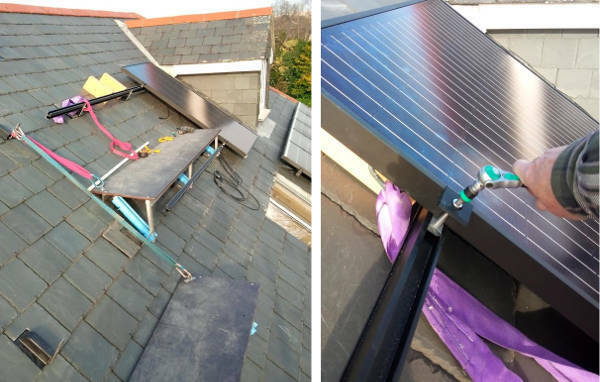
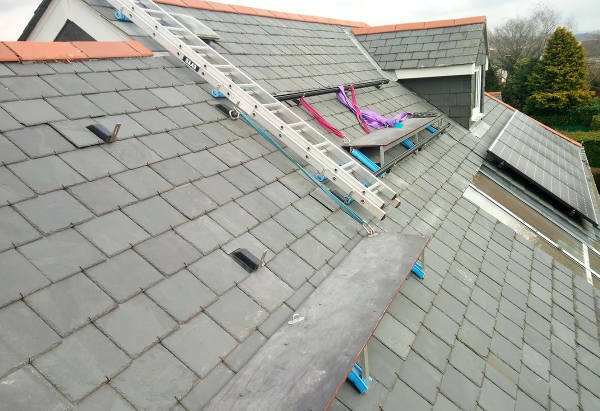
To the left of the photo is a scaffold platform under construction. This provides access to install two rows of panels above the glass roof.

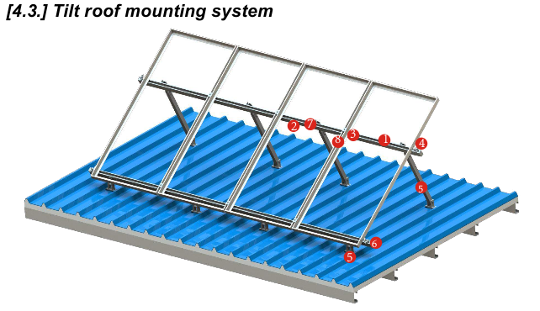
Most professional PV installations use horizontal aluminium rails and clamps to hold the panels in place. Before the rails can be fitted, the first task is to fit strong stainless steel brackets to which the rails will be bolted.


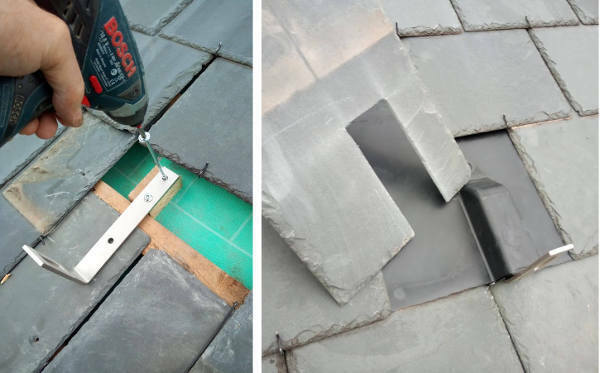
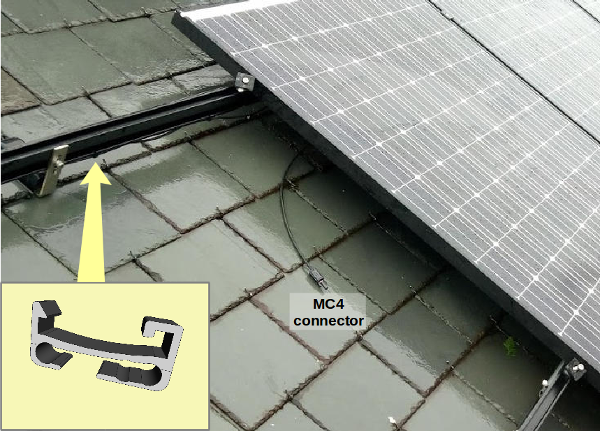
Fixing the brackets was relatively easy in my case. When I had re-slated the roof about 8 years ago I used hooks rather than copper nails. The hook allows each slate to be slid out individually. The photo on the right shows a plastic shield fitted between the slate rows. This is a SolarFlash kit which provides a highly weather-tight seal around the bracket.

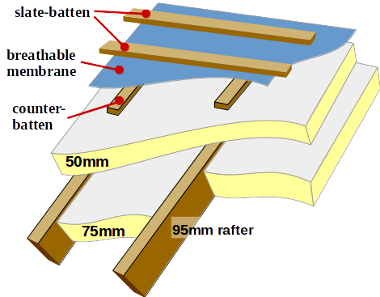
It is usually the case that a bracket is attached to the rafter below using an 85mm long M8 stainless screw. However, I have a warm-roof construction, requiring 180mm-long screws to do the job!

warm roof construction - rafters are inside the warm envelope of the house

The HSE ‘Working at heights’ directive means that fixing roof-top panels normally requires scaffolding. This would be prohibitively expensive to build above my sloping glass roof with a span of 8.6m. Instead I fixed the first few brackets from a roof-ladder, and then used lightweight angled platforms hung from the brackets I’d just fitted.

level platform held to brackets with 1-tonne slings and carabinas

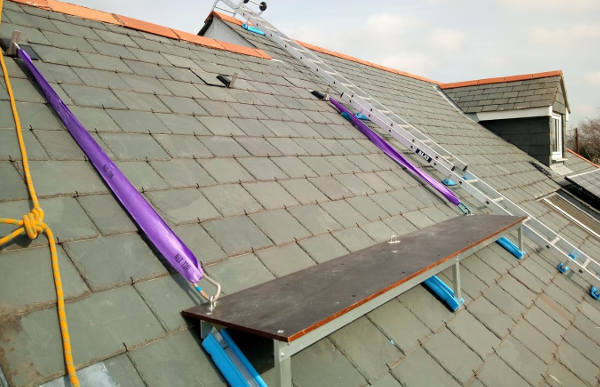
The versatility of these platforms enables them to be moved across the roof surface to reach the furthest point from the scaffold access point.

The next photo shows the first pair of aluminium rails bolted to the brackets at the far end of the run.

Rails are available in lengths of 3.0 - 3.3m. I’m using the Fastensol system which is available from major suppliers such as Midsummer in Cambridgshire.

Fastensol 3.3m rail in black

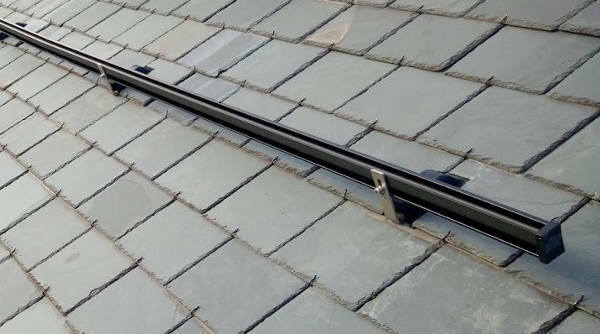
There are instructions for each manufacturer’s PV mounting system which can be used to find the required maximum distances between brackets and the inter-rail spacing. The Fastensol manual can be downloaded from Midsummer’s site.

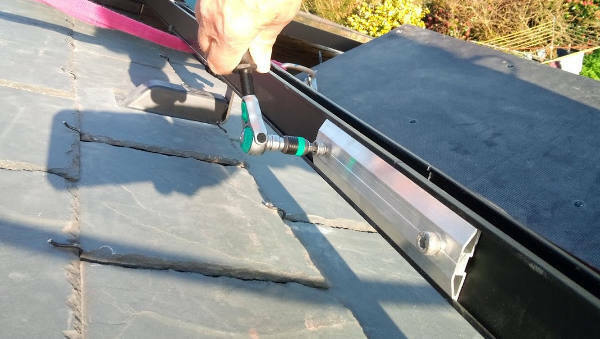
Lengths of rail can be cut with a hacksaw and joined together using a fishplate which slides into a groove at the back of the rail.

using a Wera Zyklop ratchet-driver to tighten a bolt

Safety: Although you can’t see from these photos, please note that I am wearing an approved Fall Arrest Harness, and tethered to the roof at two points by separate ropes or slings.
The ground area below me is clear; no one can be hit by a falling slate or tool.


4 replies

Userlevel 7
Badge +2

Fixing PV Panels:

There’s no ‘standard size’ for a rooftop solar panel, but they tend to be around 1.6m x 1m and weigh about 20Kg. That’s about the limit for a 1-man lift on a calm day.

As I’m using some new panels and some relocated, I’ve stuck with my favoured Panasonic HIT units. These are precisely 1590x1053mm which dictates the lengths of the mounting rails and the inter-rail gap.

Panasonic HIT 340w panels

Fixing the first panel on the rails requires extra care. If it’s not exactly at right-angles to the rails, each successive panel will progressively slew out of line.

panels are clamped to the rail, leaving an 18mm inter-panel gap

PV panels are usually supplied with a pair of fixed leads, terminating in a sealed box on the reverse side. These commonly use MC4 connectors which are polarised to ensure that +ve and -ve are correctly connected to the next panel in the string.

As access to these leads is hampered by the next panel in the row, they must be joined as each panel is installed.

Solar panel cables are generally held on the mounting rails using nylon tie-wraps. To provide me with a neater finish I designed and 3D-printed my own plastic clips which hold the cables just below the rail.

I applied the same technique to create brackets which hold the main feed cables above guttering. Cables exit the roof without passing over a sharp edge, and the clips enable them to be run to a convenient point where they can enter the building.

gutter clips for 6x 4mm² PV cable (only two runs shown above)

When the wiring system requires panels to be connected in parallel a pair of MC4 branch connectors are required.


The photo below shows the final layout for the upper roof with three string arrays now in place. It’s a more complex arrangement than most end-users would consider, and is intended to permit arrays to be switched between grid-connected and off-grid battery trials.

SW corner; a total 5.1kW of panels on the upper roof

Later I will be redoing the lower south-facing roof, adding two new LG panels to Array-D for dedicated off-grid use.

Userlevel 7
Badge +2

I would certainly agree with @EverythingNeedsAUserName that the SolarEdge system of connecting PV Panels is superior.

However, before you can appreciate why that is, it’s best to first understand the more common method of connecting rooftop Solar Panels to the Grid using a String Inverter. It has this name because it handles interconnected panels in a ‘string’.

two solar arrays connected to a typical mains inverter

There’s a lot going on in this diagram so please ask if you want a more detailed explanation!

The string inverter is shown as having two independent DC inputs. Array A is a series string of four panels. Array B is a pair of series strings connected together in parallel, which has the effect of doubling the maximum possible current. This maximum output is only achievable on a sunny day of course!

If you add together 1400 watts from A and 2800 watts from B, there’s a possible peak-sun output of 4.2kW being fed into an inverter rated at 3.6kW. That’s because the G98 standard for grid-connection in the UK allows a maximum export of 16A for a single-phase house, which is nominally 3.68kW.

The inverter isn’t damaged by having more potential input than it’s permitted to feed to the Grid, but any excess energy is simply discarded.

For a better explanation of the G98 rules for grid connection go to the topic on Obtaining Permissions for Grid Export/Import.

Userlevel 7
Badge +2

Sticking with the subject of an installation using a standard string array of PV Panels let me provide a photograph of the physical fuses, MCBs and safety isolation that are in the above diagram:

solar panel string-combiner

Although this is referred to as a ‘string-combiner’ box, it may not actually combine strings! But if you’re trying to buy one, then that’s what you’re looking for :slight_smile:

Anti-Surge devices are not mandatory, and further information about them is available in the topic on Lightning suppression.

A DC isolator, however, is an essential safety requirement. It must be a single switch that cuts all connections to the inverter. By convention, all such isolators are rotary switches and coloured red/yellow.

MCBs for DC circuits may look the same as those in your mains consumer unit. However, they are marked with polarity symbols and must be used the right way around.


A DC MCB contains a stack of arc-suppression plates. These are magnetised. When the contacts open, the resulting electric arc is pulled into the stack and quenched.

If you use it connected the wrong way around, the magnet repels the arc and welds the contacts! For obvious reasons, never buy any second-hand DC MCB. :scream:

Userlevel 7
Badge +2

As @EverythingNeedsAUserName points out @Tim_OVO there are rules for where you can and cannot fix PV Solar Panels to a roof.

The panel fixing system manufacturers offer all sorts of components which can be used on roofs and walls to achieve the required angle for your latitude on the planet.

Fastensol fixings for tilted frame on a shallow metal roof

You can then use formulae to calculate how many brackets are required and the size of screws to hold them to rafters, or there are look-up tables which do most of the maths for you.

Step 1 is to divide the roof area into zones according to the effect of wind-shear. I may be south facing, but my house is very exposed to the prevailing SW wind from the Atlantic. So this dictates how close I may have panels to that aspect and what sort of rail fixing system is required.


In my case I have installed new rafters which support the centre glass section, pass across a wall-plate and extend all the way up to the ridge. That’s 9m long each.

I also added 1200mm long straps to the wall plate to hold it strongly to the inner concrete block walls. So my roof construction is well in excess of that required under Part-A of the Building Regs. for structural parameters.


Step 2 is to decide how many fixing brackets at what intervals. Here’s the lookup table for minimum fixings on my type of sloping roof, graded according to four categories of wind:

These Wind Region categories are actually defined under Australian building rules. But wind shear operates just the same in the northern hemisphere and it’s a convenient way to define what’s required without going through the calculations myself.

I also greatly exceeded the min specification for the fixing screws, using two 8mm diameter screws for each bracket instead of 5.5mm.


I’m not surprised that installers prices have held up over the last six years.

Whilst the hardware costs have come down, the majority of the expenditure is now for:

  • labour
  • scaffolding
  • installers’ training, certifications and insurance

So if you want grid-connected solar arrays under MCS accreditation, then I really can’t see how overall costs could fall any more.

Reply