


.How to combat Climate Change without setting fire to your house!
It's autumn and energy-conscious householders will be adding insulation to lower their heating bills. But beware... your home could be getting a lot warmer than you'd intended.
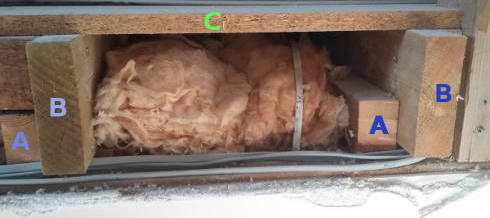
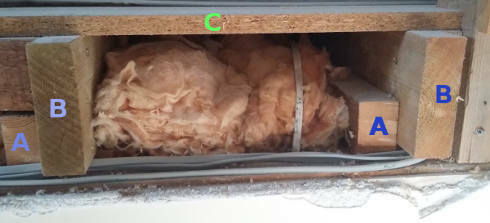
What's wrong in this picture from an attic?

At first glance this looks good. The original insulation layer above the ceiling (A) was too thin, and a second layer (B) has been added above it. The area has then been boarded with chipboard (C).
There’s a low-voltage transformer (D) which has been properly screwed to a wooden beam and insulation pulled away to make sure it doesn't overheat.
A downlighter installed in the ceiling below has been fitted with an intumescent smoke hood (E) and its ventilation holes are also left uncovered by insulation. If there’s a fire below, the intumescent material will expand rapidly, filling the hood and preventing flames and smoke spreading through the attic.
The problem, however, is the two mains electrical wires running into the insulation layers at bottom right. This is a serious fire-risk.
All electrical cables will produce heat. The higher the current (in Amps) the more energy is lost as heat.
Adding insulation above a cable like this reduces its current-carrying capacity by 50%.
Thus a typical 10kW electric shower fed via a 6mm² twin&earth cable is able to carry 46 Amps in free air, but only 23A when surrounded by loft insulation. As 10kW requires 43A, the cable was already on its limits, and it is almost certain that electricians would now use a 10mm² cable for such a shower.
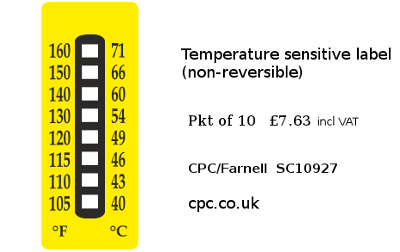
Even so, that 10mm² cable still must not be surrounded by insulation. Plastic covered cables are normally rated for a maximum 70ºC, and shouldn't ever be placed where their temperature will rise above 45ºC.
This can't be checked using test equipment carried by an electrician. If you want to know the actual temperature of a cable, then you need to stick a temperature-sensitive label to it. This will record the maximum value to which the temperature rises.
So what's the correct way to install loft insulation?
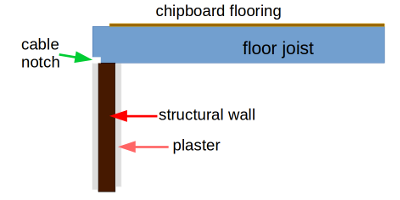
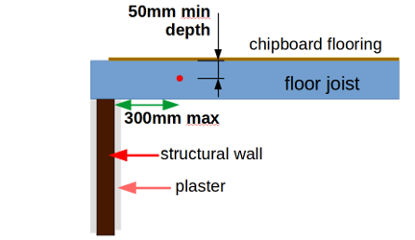
All electric cables need to be in free air above the insulation, and well clear of any flooring above.
Here's a cross-section of an attic floor as it should be. The original ceiling joists (A) have additional floor joists (B) positioned between them. The chipboard floor panels (C) are screwed to those.
In the above photograph, the floor joists (B) have notches cut from them, allowing the grey cables to pass freely along without drilling holes.
The older, white cable is run on top of the insulation, permitting it to radiate heat into the air-space above. If the cable doesn't have enough slack to do this, then replace it. The risk of a fire isn't worthwhile saving the cost of new cable.
I am constantly surprised how often I find professionally installed loft insulation which has been installed on top of heavy-current cables. Even if you have a certificate declaring that your insulation has been laid to the correct standards, that is unlikely to include the electrical cabling which the installers encountered.
If you're unsure - check it!